In order to get you started, this document will guide you through the basic features of GeneralSync. It is divided into the following feature-specific sections:
Note that this document is intended as reference providing some background information; it is not required to read through this document in order to use GeneralSync.
This segment varies depending on the operating system you use. On most computers, Microsoft Windows is pre-installed – if you're not sure what operating system you use, you probably use Windows.
Download GeneralSync using the button Download for Windows on the download page. Start the downloaded file, for example by double-clicking it or by using your browser's run action.
Follow the on-screen instructions. Whenever you're unsure, just keep the default settings and click Next until the process is complete.
Download GeneralSync using the button Download for all platforms on the download page. Unpack the downloaded archive into a folder of your choice. You can usually unpack the archive file by right-clicking it and selecting the corresponding option from the context menu.
GeneralSync does not need to get installed. You can start it directly from the unpacked folder. During the first startup, GeneralSync will also attempt to register itself as startup application, causing it to start automatically in most distributions.
Due to huge differences between Linux distributions, there are multiple potential methods to perform that first startup:
Start the entry "Start GeneralSync" in the unpacked folder, for example by double-clicking it. Not all Linux distributions support that entry, so it might be missing.
Start the file "generalsync.desktop" in the unpacked folder. You'll be asked whether you want to trust and launch GeneralSync. Choose to do so.
Some distributions will not ask whether you want to trust the launcher and display a text editor instead. In that case, close the text editor and use a different method.
Start the file "generalsync" in the unpacked folder. In some distributions, you'll be asked whether you want to run or display GeneralSync – choose run.
In some cases a text editor will open instead of starting GeneralSync. In that case, close the text editor and use a different method.
Open a terminal in the unpacked folder, and execute:
chmod a+x update generalsync && ./generalsync
If that doesn't cause GeneralSync to start, every distribution should at least produce a meaningful error message.
While starting GeneralSync, you might encounter an error message prompting you to install software required for GeneralSync to start. In many cases, it is then sufficient to agree to the automatic installation by pressing the enter key, and following the instructions on the screen. GeneralSync should then continue to start normally.
When GeneralSync is started for the first time, you will be prompted for some initial configuration. The process is quite self-explaining:
The first page of the first-run setup lists GeneralSync-compatible applications available for your computer:
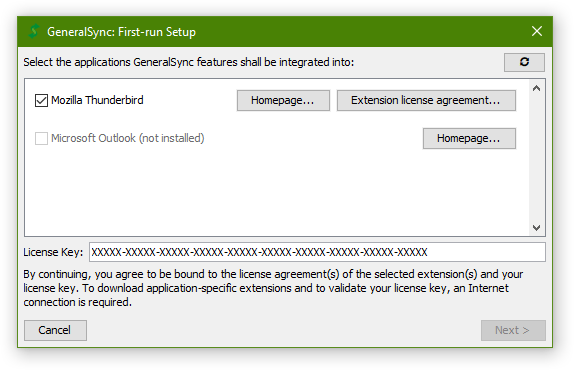
For applications requiring an add-on or extension in order to integrate with GeneralSync, said extension will be downloaded and installed automatically if the checkbox in front of its name is checked and you proceed with the setup. Follow the on-screen instructions to install the extensions, if any.
Besides selecting extensions, the first page also requires you to enter your license code. In some cases the setup will automatically enter your license code, otherwise you find your code on the download page.
If you installed a compatible application while the first-run setup was running, use the refresh button in the top-right corner of the dialog to repeat the search for installed applications.
Note that some third-party applications must be started at least once in order to be detected as installed. If GeneralSync should still fail to detect an application after you started it at least once, you may need to install the extension in question manually. You can find download links for manual installation through the license manager.
You can then select one of two modes to set up GeneralSync:
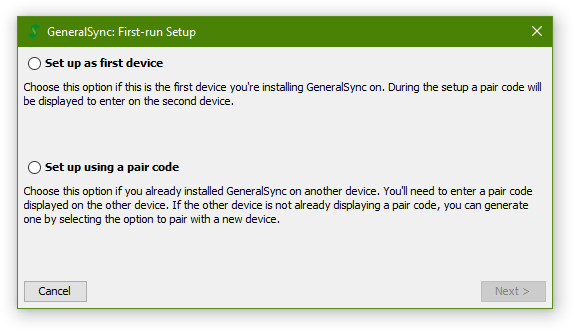
If you ever started GeneralSync on another device, choose Set up using a pair code: you can then set up a connection to another device to transfer existing data from. If you do so, continue reading in the next section.
Set up as first device should only be used on the very first device you ever set up. During the next step, you have the opportunity to create a new calendar and a new address book:
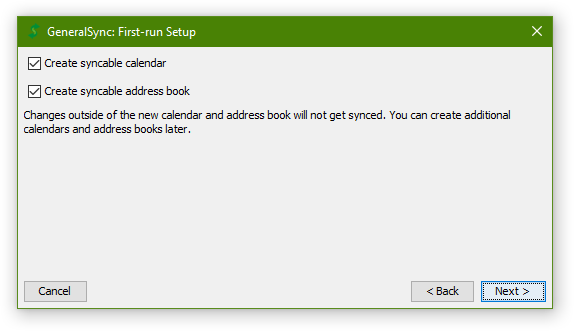
To use the new calendar and/or address book on another device as well, you now need to establish a connection to another device. The process is covered in the following section.
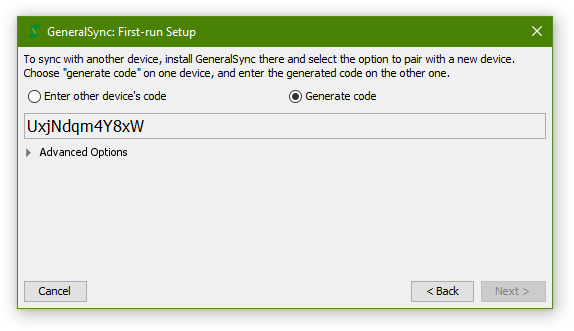
In order to directly exchange data between two devices, GeneralSync requires the two devices to be paired. For that, a pair code is generated on one of the devices, which must be entered on the other device:
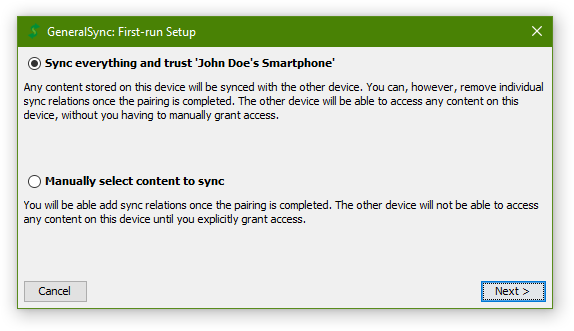
On both devices, you can then select whether to sync everything, or if you want to customize what content is synced:
More details on this choice and on pairing in general is available in the pairing chapter of this guide.
The first-run setup is now complete. After you click on Finish, the Dashboard will be shown. If you wanted to sync everything with a single device, you don't need to do anything else – you can simply close it.
Otherwise the next chapters will help you to manage devices and sync relations.
GeneralSync is usually running in the background, performing all tasks automatically. In the rare cases you wish to directly interact with GeneralSync, you can do so through the sync dashboard explained in this section.
You can open the sync dashboard in multiple ways. The easiest option is through the GeneralSync tray icon: a double-click opens the dashboard directly, while opening its context menu also provides an option to bring up the dashboard.

Alternatively, start GeneralSync again while it is already running, for example through the Start menu (on Windows).
The dashboard consists of two parts: a list on the left to select entries in, and details of the selected entry on the right. Besides calendars and address books, the list also contains all paired devices. Managing devices is covered in the next section, while this section covers managing content to sync.
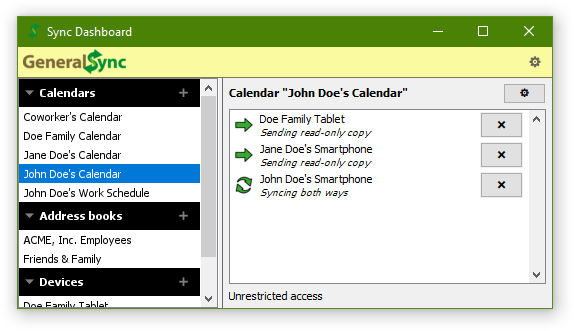
The list on the left is grouped by category. You can add new entries using the plus buttons within the category headers. For example, you can create a new calendar using the plus button in the calendar header.
The details on the right are divided into three parts. On the top, there's the name of the selected content alongside a button to change it (gear icon). Using the dialog to change the name, you can also delete the content.
Below the name, there's a list of sync relations: for every paired device, you can start or stop the synchronization using the buttons on the right. More details on sync relations are available in a later chapter of this guide.
Finally, the line at the bottom displays any restrictions associated with the content. For example, you'd see a note here if this device only has a read-only copy of the content and it is thus impossible to change anything within it.
When selecting a device in the list on the left, the right hand side will display details for that device:
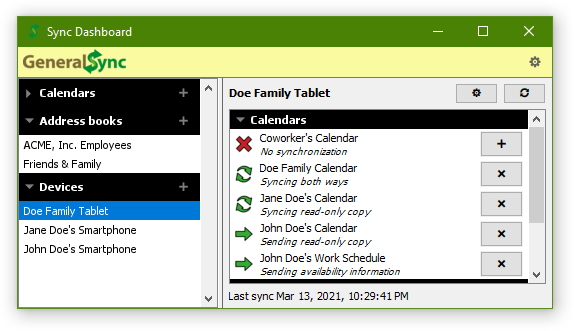
The layout is similar to the one for content: sync relations are again displayed in the middle, permitting to start or stop syncing using buttons on the right. The line below displays the timestamp of the last successfully sync with the device.
While GeneralSync syncs automatically, you can also use the refresh button in the top-right corner to force an immediate sync. Using the gear button besides it you can change more than just the name:

Besides some options for advanced users, the dialog also permits you to select if and how sync relations should be automatically confirmed or established. You can set the option Trust automatically to one of the following values:
Sync relations always need manual confirmation – Manual confirmation is required for any kind of sync relation. Without explicit consent, no data is sent or received.
Automatically accept new content – The device may supply content without explicit confirmation. Said content will then continue to get synced with the device, but any access to existing content requires your confirmation.
This option can be used to reduce the amount of confirmations necessary to set up GeneralSync, without completely trusting the other device. It is thus the default settings for devices you don't sync everything with.
Automatically accept all sync relations – Sync relations initiated by this device become active without any confirmation. Choosing this option effectively grants the device read and write access to all content.
Only choose this option if the device is in your possession or you trust the device's owner completely.
Automatically establish sync relations – In addition to activating all sync relations without confirmation, this option also adds bidirectional sync relations for any newly created content.
This option lets you mirror your data on another device without the need to manually add sync relations. It is thus the default option when choosing Sync everything and trust during pairing.
Only choose this option if the device is in your possession or you trust the device's owner completely.
Furthermore, the Unpair... button at the bottom of the dialog permits to remove all sync relations with this device and remove the device from the list of devices. The other device will continue to display the pairing until you unpair there as well. Unpairing doesn't affect any content received from the device.
Besides the buttons for content and device tabs, the dashboard's header line also features a gear-icon to bring up the main configuration dialog:
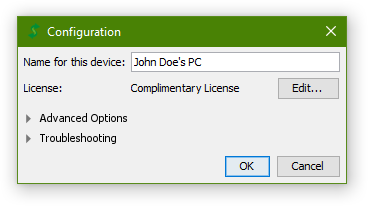
Here you can edit the device's name or change the license used. In addition, the configuration dialog – like some other dialogs – features some advanced options for expert users, that should not be altered unless you know what you're doing. Below that, the troubleshooting section contains technical information about your installation and access to the system log. If you ask for help, mention the version number shown there.
In order to exchange data with another device, said device must be paired. For technical reasons, pairing requires a short alphanumeric code to be generated on one of the devices and entered on the other device. Pair codes are case-sensitive and can only be used once and while they're displayed.
To start pairing with a device, click on the plus button in the Devices header in the dashboard's left list. During the first-run setup, you can also pair a device – there are no differences between the first-run and subsequent pairings.
When opening the pair dialog, it permits you to enter a pair code right away:
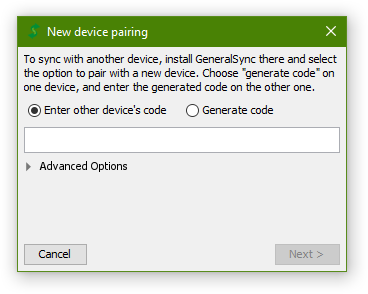
If the other device is connected to the same network, it is sufficient to enter the code generated by the other device and click Next. GeneralSync will then exchange all necessary data and move on to the next step.
Expert users can also initiate a pairing with devices not connected to the same network, but the configuration required to do so securely is way beyond the scope of this guide. The configuration options required for that can be found within the advanced option sections of both the pair dialog and the configuration dialog.
If you'd rather generate a code to enter on the other device, select the Generate code option:
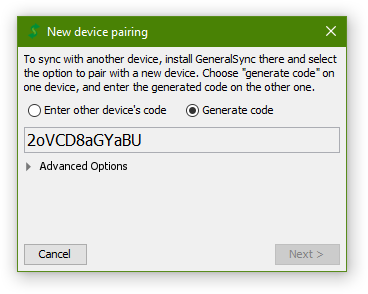
Enter the displayed pair code on the other device. Once all necessary data is exchanged, the dialog will move to the page described in the next section.
Once the pairing data has been exchanged, you can choose between two options:
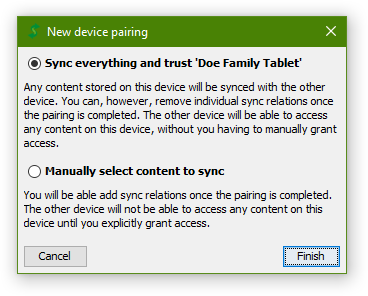
Sync everything and trust – All calendars and address books will get synced with the other device, including ones added in the future. The device will get unrestricted access to any content stored on this device.
Only choose this option if the device is in your possession or you trust the device's owner completely.
Manually select content to sync – Initially, nothing is synced with the device. You can manually add arbitrary sync relations later. The other device will not be able to access any content currently stored on this device, unless you explicitly permit it to do so. Details on that permission can be found in the next chapter.
This option should be used if you do not trust the user of the other device or only want to sync a part of your data.
GeneralSync automatically syncs in the background. To select what data is exchanged with which devices, you can create or remove sync relations. A sync relation connects syncable content (i.e. a Calendar) with a paired device.
There are two basic types that you can choose from when adding sync relations:
Bidirectional Synchronization – the same content is available on both devices. If a change is recorded on one device, it is distributed to the other one.
Unidirectional Sending / Receiving – one device holds a complete, writeable version of the content, and provides read-only access to said content or parts of it towards the other device. If a change is recorded on the sending device, it is distributed to the receiving one, but not vice-versa.
For any content, you can select:
all content – everything is transmitted, without any restrictions
For calendars, you can select more restricted options:
availability information – for each event, only start time, end time and availability (free/busy) is transmitted. Any other details are removed before sending.
non-confidential events and availability information – events marked as confidential resp. private are transmitted as in the mode availability information: only start time, end time and availability information is sent. All other events are transmitted in their entirety.
In the dashboard, a sync relation's mode is indicated with a small icon. The various icons are explained in the next section.
To protect your data, GeneralSync will not send or receive any data without explicit user approval. After creating a sync relation, it is thus required to confirm the relation on the other device. You can use device settings to automatically confirm sync relations in specific situations.
New sync relations are thus inactive until they are confirmed. The state of a sync relation is indicated by the color of its icon:
| Active sync relation | |
|---|---|
| Syncing both ways – the content is available on both devices. Changes on one device will be automatically transmitted to the other device. To stop syncing, click the cross mark button. | |
| Syncing read-only copy – the content is available and read-only on both devices. When receiving changes from a third devices, these changes will get transferred to the other device. To stop syncing, click the cross mark button. | |
| Sending [...] – the other device gets access to a read-only copy of the content or a part of it. Changes will get transferred automatically towards the other device (but not vice-versa). To stop the transfer, click the cross mark button. | |
| Receiving read-only copy – the other device provides access to a read-only copy of the content or to a part of it. To stop the transfer, click the cross mark button. | |
| Inactive sync relation | |
|---|---|
|
|
Sync relation available – a sync relations has been created on the other device, which is not yet confirmed. Click on the check mark button to confirm the sync relation and start syncing. (The icon depends on the type of the sync relation.) |
|
|
Pending confirmation on other device – a sync relations has been created, but it has not yet been confirmed on the other device. Click on the cross mark button to cancel or confirm the relation on the other device to start syncing. (The icon depends on the type of the sync relation.) |
| No sync relation | |
|---|---|
| No synchronization – No data is transferred. To change that, create a new sync relation using the plus button. | |
| Incompatible data prevents synchronization – No data is transferred. There is a sync relation created on the other device, which cannot be confirmed. Depending on the situation, you either need to remove the sync relation on the other device or remove conflicting content on this device to be able to establish a sync relation. | |
While active sync relations are visible both when selecting the associated device and when selecting the associated content, inactive sync are in some cases only visible in one of the two. For example, an unconfirmed sync relation for a calendar is only visible when selecting the calendar, as it might not yet exist on the other device.
You can add a new sync relation on the PC using in any list of sync relations within the dashboard. Click on the plus button besides the device resp. content to sync. You'll now see the dialog to create a new sync relation:
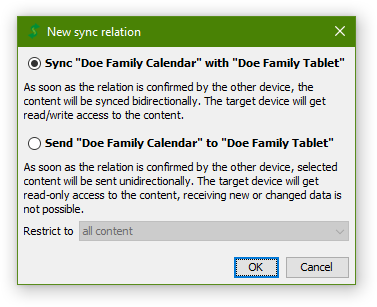
As discussed before, you have the option to either bidirectionally sync data, or to send it without receiving changes from the target device. In the latter case, it may be possible to restrict the content you're sending according to predefined filter rules by selecting the corresponding option from the Restrict to field.
If you want to sync a read-only copy of any content, most inputs are disabled: read-only content can only be transferred bidirectionally.
After selecting the correct type and filter, click Ok to create the sync relation. The relation will start as inactive. Once it is confirmed on the other device, it will become active and automatically operate in the background.
Accessing GeneralSync calendars and address books using other applications may required the installation of an add-on, add-in or other kind of extension. For details on how to access GeneralSync from supported applications, refer to the documentation of the GeneralSync extension you use (or to the documentation of the application itself, if no extension is required).
Feel free to contact us if you have further questions or suggestions regarding this guide or GeneralSync itself.